The Complete Guide to Setting Up 3CX PBX On an On-Premise Server
From bare-metal server to a fully operational enterprise phone system — provision Grandstream phones, connect landlines via FXO, add GSM lines with DINSTAR, design IVR flows, integrate your CRM, and launch a professional call center. Step by step.
Why On-Premise 3CX?
Your Phone System. Your Server. Your Full Control.
Businesses across Pakistan are ditching expensive legacy PBX hardware and overpriced cloud telephony subscriptions in favour of 3CX — the world's most popular software-based PBX. 3CX runs on a standard Windows or Linux server you already own, giving you enterprise-grade VoIP features without recurring per-seat cloud bills. At TekkPak Technologies, we have deployed hundreds of 3CX systems across sectors ranging from healthcare and retail to finance and logistics.
This guide covers everything: base installation, provisioning Grandstream handsets, connecting PSTN landlines via a Grandstream HT FXO gateway, bridging GSM mobile lines with a DINSTAR gateway, designing an intelligent IVR, integrating your CRM, enabling WhatsApp and Facebook messaging, embedding a live-chat and click-to-call widget on your website, and configuring a full-featured call center queue. Whether you are a system administrator tackling your first 3CX install, or a decision-maker evaluating whether to move off your aging hardware PBX, this is the definitive resource.
Step-By-Step Setup
10 Steps to a Production-Ready 3CX System
Follow these steps in sequence. Each builds on the previous, taking your 3CX from installation to a fully operational business communications platform.
// FOUNDATION
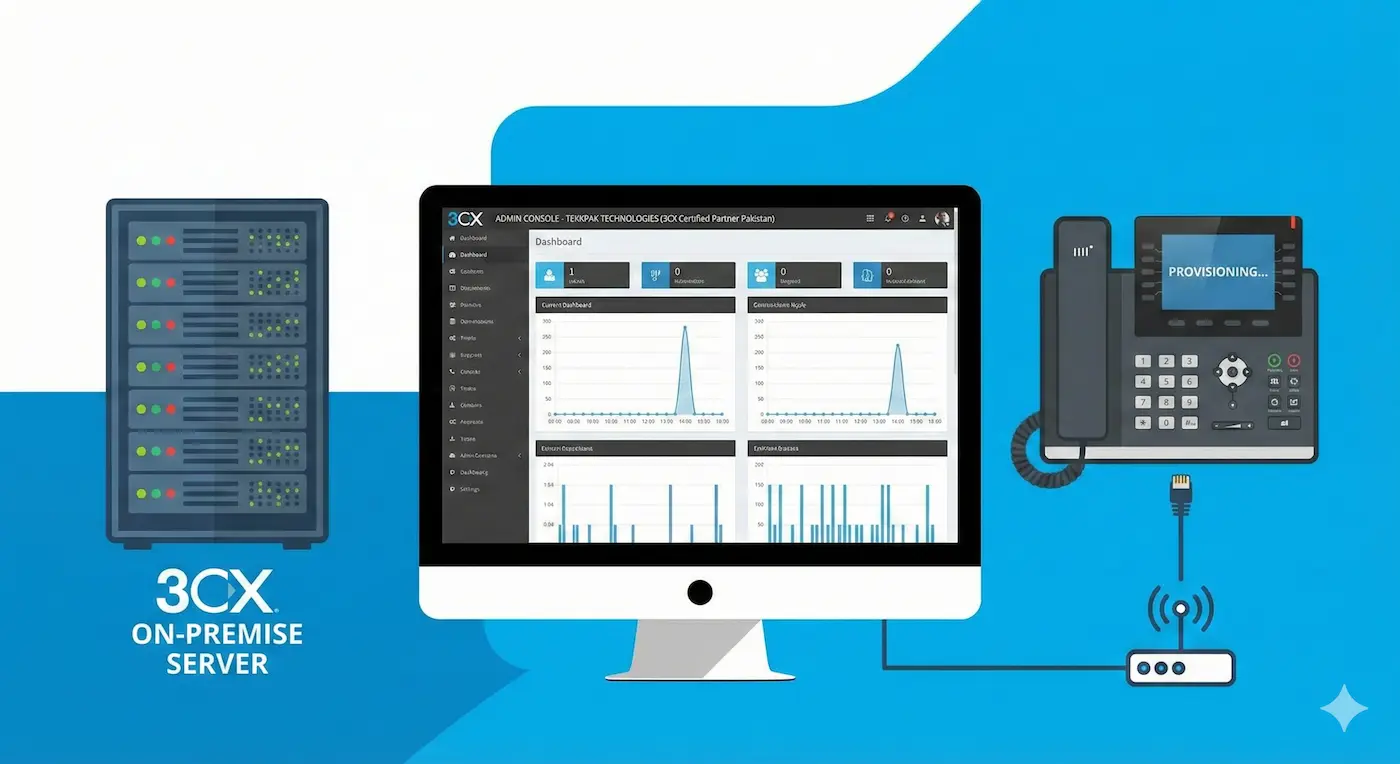
Server Preparation & 3CX Base Installation
- Prepare a dedicated machine — minimum 4 vCPU, 4 GB RAM, 60 GB SSD. Use Debian Linux (recommended) or Windows Server 2019/2022.
- Log in at www.3cx.com, go to My Dashboard → Add PBX, select On-Premise, choose your FQDN carefully — this cannot be changed after installation — and set your extension digit length.
- Download the generated 3CX ISO or Windows installer, run it on the server, and follow the web-based wizard on port 5015. Upload the configuration file downloaded from the portal when prompted.
- Assign a Static LAN IP to the server, configure Split DNS so the FQDN resolves internally to the private IP and externally to the public IP, then forward ports 5060 UDP, 9000–9500 UDP, 443 TCP, and 5001 TCP on your router or firewall.
- Set the correct Time Zone (Asia/Karachi for Pakistan), complete the wizard, and immediately change the default admin password upon first login to the Admin Console.
// IP PHONES
Provisioning Grandstream IP Phones
- In the 3CX Admin Console, go to Users → Add User, create the extension with a name, number, and strong SIP password, then click Save.
- Navigate to Phones → Add Phone, enter the Grandstream phone's MAC address (found on the label on the underside of the device), select the correct model from the dropdown, and link it to the extension.
- Connect the Grandstream IP phone to the same LAN switch as the 3CX server using an Ethernet cable and power it on. The phone automatically contacts the 3CX provisioning server via Plug and Play (PnP) and downloads its full configuration — no manual entry required on the phone itself.
- For remote or branch-office phones, deploy a 3CX Session Border Controller (SBC) at the remote site, or enable STUN-based provisioning using stun.3cx.com:3478 so phones register securely over the internet.
- Factory reset any previously configured Grandstream phones before provisioning. After registration, assign BLF keys to monitor colleagues' line status directly from the phone's programmable buttons.
// SOFTPHONE APP
Provisioning the 3CX Mobile & Desktop App
- In the 3CX Admin Console, open the user's extension settings and click Send Welcome Email. The email is automatically dispatched to the user's registered email address.
- The welcome email contains a QR code and a one-click provisioning link. Have the user download the 3CX app on their iOS or Android device from the App Store or Google Play.
- Open the 3CX app, tap Scan QR Code, and point the camera at the QR code in the welcome email. The app self-configures in seconds — SIP credentials, server address, and extension are all filled in automatically.
- For Windows or macOS, the user clicks the provisioning link in the welcome email. This opens and auto-configures the 3CX desktop app without any manual credential entry.
- Enable Push Notifications in the app settings so the user receives incoming calls even when the app is running in the background on their mobile device.
// FXO GATEWAY · LANDLINES
Configuring Grandstream HT Series FXO Gateway
- Factory reset the Grandstream GXW4104 / GXW4108 by holding the reset button for 10 seconds. Connect the device to your LAN switch and plug your PSTN/PTCL landline cables into the FXO ports on the back.
- In the 3CX Admin Console, navigate to Voice & Chat → VoIP Gateways → Add Gateway. Select the Grandstream GXW4104 template, enter the device's MAC address, and set the Main Trunk Number to your primary inbound landline number. Click Generate Device Configuration and copy the provisioning URL.
- Log into the GXW's web interface (find its IP from your router's DHCP table). Go to Maintenance → Upgrade and paste the 3CX provisioning URL into the Config Server Path field. Click Save and Apply, then reboot the device.
- After reboot, the gateway automatically registers to 3CX as a SIP trunk. In the 3CX Admin Console, go to Voice & Chat → Inbound Rules and create a rule that routes inbound calls from this trunk to your IVR, ring group, or receptionist extension.
- Test by calling the landline number from an external phone and confirming the call arrives on the correct 3CX extension or IVR.
// GSM GATEWAY · MOBILE LINES
Configuring DINSTAR GSM Gateway for SIM-Based Lines
- Insert your SIM cards into the slots on the DINSTAR UC2000 GSM gateway. Connect the device to your LAN switch, power it on, and access its web interface using the IP shown on the device LCD or your DHCP table.
- In the 3CX Admin Console, go to Voice & Chat → SIP Trunks → Add SIP Trunk. Select Generic as the provider, name it DINSTAR GSM, and enter the DINSTAR device's LAN IP address as the Trunk Hostname. Note the SIP username and password that 3CX generates.
- In the DINSTAR web interface, navigate to VoIP → SIP → SIP Account. Set the SIP Server field to your 3CX server's LAN IP address and port 5060. Enter the SIP username and password copied from the 3CX trunk settings. Click Apply.
- Go to GSM → Channel in the DINSTAR interface and assign each active SIM slot to the SIP account you just configured. The DINSTAR will register to 3CX as a trunk within a few seconds — confirm the trunk shows Registered in the 3CX Admin Console.
- In 3CX, create an Outbound Rule that routes calls to mobile numbers (e.g., prefix 03xx) through the DINSTAR trunk. Test by dialling a mobile number from any extension — the call will route over the SIM card, cutting costs significantly.
// IVR · CALL FLOW
Designing Your IVR & Intelligent Call Flow
- In the 3CX Admin Console, navigate to Voice & Chat → Digital Receptionist and click Add. Give it a name such as "Main Menu".
- Under Prompt, upload a pre-recorded WAV or MP3 file with your greeting message — for example, "Thank you for calling. Press 1 for Sales, Press 2 for Support, or Press 0 for the Operator." Alternatively, use the built-in Text-to-Speech option to generate a temporary prompt.
- Under Key Press Events, map each digit: set 1 → Sales Ring Group, set 2 → Support Queue, set 0 → Receptionist Extension. Add a Timeout Destination for callers who do not press anything.
- Go to Voice & Chat → Inbound Rules, select your trunk (FXO or DINSTAR), and set the Destination to the Digital Receptionist you just created. Save and apply changes.
- Configure Office Hours and Break Time Routing under the inbound rule — route to the IVR during business hours and to an out-of-hours voicemail message or on-call extension during nights and weekends.
// CRM INTEGRATION
Connecting 3CX to Your CRM System
- In the 3CX Admin Console, go to Integrations → CRM Integration and click Add. Choose your CRM from the list — supported platforms include Salesforce, HubSpot, Zoho CRM, Odoo, Microsoft Dynamics 365, Freshdesk, SugarCRM, and 15 more.
- Log into your CRM portal and generate an API Key or OAuth access token. Paste it into the corresponding field in 3CX and click Test Connection to verify it is active.
- Enable Click-to-Dial so agents can click any phone number inside the CRM and 3CX immediately initiates the outbound call — no manual dialling needed.
- Enable Automatic Contact Lookup: when an inbound call arrives, 3CX queries the CRM in real-time and displays the matching contact's name and record on the agent's screen before they answer.
- Enable Automatic Call Journaling so every call — inbound and outbound, including duration and call recording link — is automatically logged against the correct CRM contact or deal record without any manual input from the agent.
// MESSAGING CHANNELS
Integrating WhatsApp Business & Facebook Messenger
- In the 3CX Admin Console, navigate to Integrations → Messaging Channels and click Add Channel.
- For WhatsApp: select WhatsApp Business API. You will need an approved WhatsApp Business API account via a registered Business Service Provider (BSP). Enter your BSP-issued API token and phone number ID, then click Save.
- For Facebook Messenger: select Facebook from the channel list and click Connect with Facebook. Log in with your Facebook Business account, select the correct Facebook Page, and grant the required permissions. Click Confirm.
- Both channels will now appear as message queues in the 3CX web client and mobile app, directly alongside your voice call queues. Assign each messaging channel to the appropriate agent group or queue from the Queue settings.
- For 24/7 automated first-response on WhatsApp before a live agent picks up, integrate TekkPak's AI WhatsApp Agent — it qualifies leads, answers FAQs, and escalates to a 3CX agent only when needed.
// WEBSITE WIDGET
Live Chat & Click-to-Call Button on Your Website
- In the 3CX Admin Console, go to Web & Chat → Website Chats and click Add Website. Give it a name, enter your website's domain, and choose which queue or extension incoming chats should be routed to.
- Customise the chat widget appearance — choose the button colour, position (bottom-right or bottom-left), and the greeting message visitors will see when the chat bubble loads on your site.
- Enable Click-to-Call from the same widget settings by toggling the option on. This adds a phone icon to the chat bubble; when a website visitor clicks it, their browser opens a WebRTC-based voice call directly to your 3CX queue — no phone number to type, no app required.
- Copy the generated JavaScript embed code. In your website, paste it just before the closing